|
|
 |
 |
 |
| |
3D Stroke 2.0 Manual
 |
|
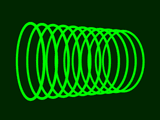
3D Stroke is a stroke rendering plug-in for Adobe After Effects. It uses the path from one or more masks to render strokes that can be rotated and moved freely in 3D space. It has a built-in camera for AE41 users, and can also use AE5:s comp camera. The strokes will not dissapear when viewed from the side.
ALWAYS apply 3D Stroke to a comp-sized 2D layer.
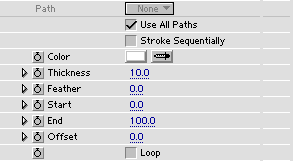
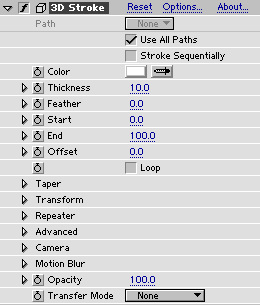
To the left is a picture of the 3D Stroke effect controls as they appear when the plug-in is initially applied.
|
|
3D Stroke is distributed as an unlockable demo. It is fully-functional, but renders a cross over the frames. To purchase an unlocking key, and get tutorials and support, go to:
www.trapcode.com
|
|
Sections:
Quickstart
Overview
Main controls
Taper
Transform
Repeater
Advanced
Camera
Motion Blur
Opacity & Transfer Mode
Very thin lines
AE5: Use transform of null-object
|
| |
 |
|
 |
|
| |
|
|
| |
|
|
| |
|
|
|
| |
Main controls
|
|
Path selects which mask to extract the path from.
Use All Paths - if this checkbox is set, the paths from all masks in the layer are stroked.
Stroke Sequentially - this checkbox only works if Use All Paths above is checked. If checked, it means that the Start and End sliders below will affect the paths sequentially. This is handy for a "text reveal" effect.
Color sets color for the stroke.
Thickness sets thickness of the stroke. See also: very thin lines.
Feather sets softness of the stroke edges.
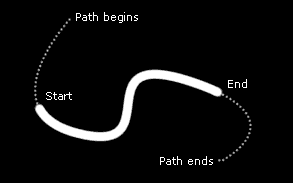
Start sets where on the path(s) the stroke starts.
End sets where on the path(s) the stroke ends.
Offset provides an offset for both Start and End above so that the stroke can slide on its path.
Loop - if checked, the stroke will re-enter the path when it is slided past the end. Negative values for Offset can be used to reveal/hide the stroke when Loop is on.
|
|
|
|
|
|
|
| |
|
|
|
| |
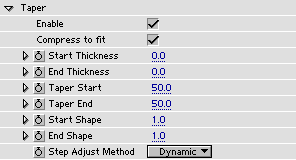
Taper
 |
 |
|
Compress to fit On |
 |
|
Compress to fit Off |
|
Enable turns tapering on and off.
Compress to fit - if this checkbox is set, the tapered stroke is compressed to fit inside the Start and End sliders (from Main Controls). This option does not work with Stroke Sequentially.
Start Thickness sets thickness of the start of the stroke.
End Thickness sets thickness of the end of the stroke.
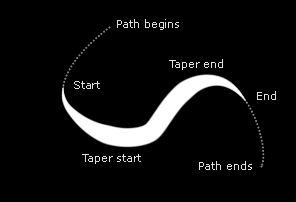
Taper Start controls where on the stroke tapering begins on the "Start" side.
Taper End controls where on the stroke tapering begins on the "End" side.
Start Shape controls the shape of the tapering on the "Start" side.
End Shape controls the shape of the tapering on the "End" side.
Step Adjust Method - this pop-up presents two alternatives for how the step size should be handled when using tapering: None means step size is fixed. Dynamic means the step size is adjusted dynamically along the tapered stroke.
|
|
|
|
|
|
|
| |
|
|
|
| |
Transform
 |
 |
 |
|
Bend = 0.0 |
Bend = 0.4 |
 |
 |
|
Bend = 1.0 |
Bend = 2.0 |
|
Bend - bends the path around the Bend Axis. At 1.0 the path will form a half circle. At 2.0 it will become a full circle. It can be set even further up to 100.
Bend Axis sets the axis for bending.
Bend Around Center offsets the stroke so that the center for rotation is the same as center for bend. Warning: At low bend settings this will offset the stroke a lot. When bend is zero this checkbox has no effect.
XY Position sets the position of the stroke center in the XY-plane.
Z Position sets the position of the stroke center in the Z direction.
X,Y,Z Rotation sets the strokes rotation about the X,Y and Z axis.
Order sets in which order the rotation and translation should happen. The default is Rotate, Translate which is useful when syncronizing with a 3D layer. The other setting, Translate, Rotate is useful when it is desired to offset the rotation center of the stroke.
AE5 users, see also: Use transform of null-object
|
|
|
|
|
|
|
| |
|
|
|
| |
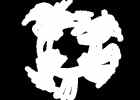
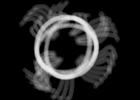
Repeater
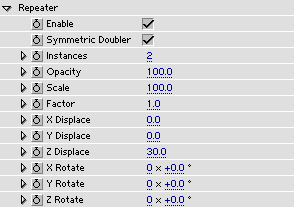 |
Enable turns the repeater on and off.
Symmetric Doubler makes two symmetric repetitions of the strokes.
Instances sets the number of repetitions.
Opacity sets the percentage of Internal Opacity that should remain for each repetition.
Scale sets the scaling for each repetition.
Factor affects the Displacement and Rotation below. This is used to create exponential growth or decay for each repetition. A value larger than 1 will create growth and smaller than 1 will create decay.
X,Y,Z Displace sets the displacement in respective direction for each instance.
X,Y,Z Rotate sets the rotation about respective axis for each instance.
|
 |
 |
 |
|
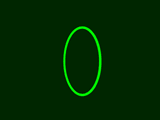
Repeater Off |
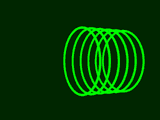
Repeater On - Symmetry Off |
Symmetry On |
|
|
|
|
|
|
| |
|
|
| |
|
|
|
| |
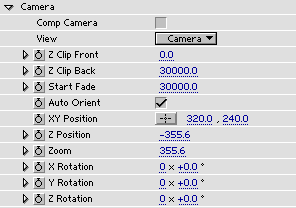
Camera
|
|
Comp Camera - check this to use the Comp Camera (AE5 only).
View - selects view. There is the Camera view and there are six ortho views: Front,
Left, Top, Back, Right and Bottom. The ortho views were mainly supplied for AE5 users to use when the Comp View is set to one of the ortho views.
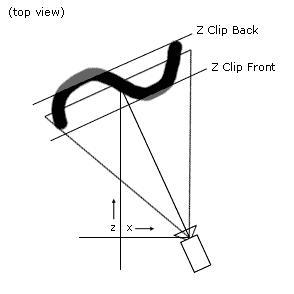
Z Clip Front sets the clipping plane close to the camera.
Z Clip Back sets the clipping plane far away from the camera. Clipping planes can be used to
make simple object intertwinings and intersections. Always remember that they are in view space, which means that one must take care when moving the camera. Clipping can be inspected in the ortho views.
Start Fade by setting a value lower than Z Clip Back, the strokes will fade out in opacity from this position, reaching zero opacity at Z Clip Back.
Auto Orient - when checked the camera always points to the center regardless of the camera position. However, the Rotation parameters will still have effect so the camera can be made to always look at a point, for example, 30 degrees left of the center. Normally, one should leave the Rotation parameters at zero when using Auto Orientation.
The center is defined as:
X=half the width of the layer,
Y=half the height of the layer,
Z=0.
Auto Orient is useful for maintaining the object in center during a fly-by.
XY Position sets the camera position in the XY-plane.
Z Position sets the camera position in the Z direction.
Zoom sets the camera zoom. The zoom indirectly sets the Field of View of the camera.
X,Y,Z Rotation sets camera rotation around X,Y and Z axis.
|
|
|
|
|
|
|
| |
|
|
|
| |
Motion Blur
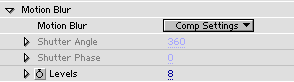 |
Motion Blur is a pop-up with the choices: On, Comp Settings and Off.
On means motion blur is on, no matter the comp settings. Shutter angle and phase are set below.
Comp Settings means the comp settings for motion blur are used. This is the default and recommended. Shutter angle and phase are taken from the compostion settings.
Off means motion blur is not used.
Shutter Angle sets how long time the shutter stays open to capture one frame. 360 means it's open the entire time of the frame. 180 means it is open half the time of a frame.
Shutter Phase sets when the shutter opens. 0 means at start of frame. AE5: If set negative and the plug uses the comp camera the camera layer needs to start one frame before the layer to which 3D Stroke is applied.
Levels sets at how many points in time the image should be sampled. If movement is very fast, this should be high to make smooth images. If movement is slow, this should be set low (or motion blur should be turned off) to reduce render time. This setting can be keyframed for optimal performance.
|
|
|
|
|
|
|
| |
|
|
| |
|
|
| |
|
|
|
| |
AE5: Use transform of null-object
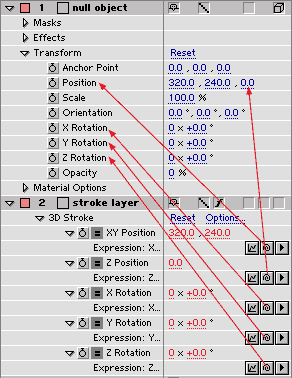 |
Sometimes it is very handy to make 3D Stroke use the transform of a 3D null-object or a 3D layer. This is done using expressions.
Enable expressions for all parameters under the Transform group. Then grab the small spiral symbols (the "pickwhip") and drag them to corresponding parameters in a null or layer as described in the image to the left.
Notice that XY Position is dragged to the Position parameter name, but Z Position is dragged to the actual Z-coordinate to the right.
Also make sure that Order is set to Rotate, Translate
It is possible to use the orientation values instead.
|
|
|
|
|
|
|

|
©2001-2002 Trapcode |
|